# Official Postmark libraries
These libraries are maintained by the developers at Postmark and are the easiest way to integrate Postmark with your application.
### Don’t see the library you’re looking for?
If you can’t find the right library, check out our [Community Libraries](/libraries/community). If you’re looking for code to use with **Postmark Inbound** try our [email parse code examples](https://postmarkapp.com/developer/user-guide/inbound/parse-an-email#code-examples).
We’re building a wishlist of Postmark plugins, libraries, and integrations. If you have something you’d like to see, or would like to contribute, [let us know](https://postmarkapp.com/contact)!
## TypeScript
### **New!** Quick start
Requirements
- Node.js 18+ or Bun
- TypeScript project (or ts-node)
Installation
### Install
```bash
npm install postmark
```
### Environment variables
```bash
POSTMARK_SERVER_TOKEN=your_server_token
```
### Shared client
```typescript
import { ServerClient } from "postmark";
export const postmark = new ServerClient(process.env.POSTMARK_SERVER_TOKEN!);
```
### Send a welcome email with a template
Use sendEmailWithTemplate with a TemplateAlias and TemplateModel instead of inline HTML. This is the recommended path for all production transactional email — templates are reusable, testable, and give Postmark the context it needs to optimize delivery.
### Welcome email
```typescript
export async function sendWelcomeEmail(to: string, name: string) {
const message = await postmark.sendEmailWithTemplate({
From: "welcome@acme.example",
To: to,
TemplateAlias: "welcome",
TemplateModel: { name },
MessageStream: "outbound",
});
return message.MessageID;
}
```
### Send a typed receipt email
Type your TemplateModel to catch missing fields at compile time. Return the MessageID so your application can map the send back to a specific transaction.
### Receipt email
```typescript
type ReceiptEmail = {
to: string;
receiptId: string;
amount: string;
dashboardUrl: string;
};
export async function sendReceiptEmail(input: ReceiptEmail) {
const message = await postmark.sendEmailWithTemplate({
From: "billing@acme.example",
To: input.to,
TemplateAlias: "receipt",
TemplateModel: {
receipt_id: input.receiptId,
amount: input.amount,
dashboard_url: input.dashboardUrl,
},
MessageStream: "outbound",
});
return message.MessageID;
}
```
### Batch send with partial-failure handling
Use Promise.allSettled instead of Promise.all so one failed recipient doesn't mask successful sends. Each result includes the MessageID for successful sends and the error reason for failures.
### Batch welcome
```typescript
export async function sendBatchWelcome(
recipients: Array<{ email: string; name: string }>
) {
const results = await Promise.allSettled(
recipients.map((r) =>
postmark.sendEmailWithTemplate({
From: "welcome@acme.example",
To: r.email,
TemplateAlias: "welcome",
TemplateModel: { name: r.name },
MessageStream: "outbound",
})
)
);
return results.map((result, index) => ({
email: recipients[index].email,
ok: result.status === "fulfilled",
messageId:
result.status === "fulfilled" ? result.value.MessageID : undefined,
error:
result.status === "rejected" ? String(result.reason) : undefined,
}));
}
```
### Verify delivery webhooks
Postmark doesn't sign webhooks with HMAC. Protect the endpoint with HTTP Basic Authentication and IP allowlisting, and validate the payload shape before acting on it.
### Webhook handler
```typescript
export async function handleEmailWebhook(rawBody: string) {
// Postmark doesn't sign webhooks. Protect the endpoint with HTTP Basic Auth
// and IP allowlisting (see the note below). As a safeguard, validate the
// payload's shape before acting on it.
const event = JSON.parse(rawBody) as {
RecordType: string;
MessageID: string;
Description?: string;
};
if (!event.RecordType || !event.MessageID) {
throw new Error("Unexpected webhook payload");
}
if (event.RecordType === "Delivery") {
return { ok: true, id: event.MessageID };
}
if (event.RecordType === "Bounce") {
return { ok: false, id: event.MessageID, reason: event.Description };
}
// Acknowledge unhandled types too
return { ok: true };
}
```
## Agent repair guide
If your integration isn't working, check this table before switching providers.
| Failure mode | Fix |
|---|---|
| POSTMARK_SERVER_TOKEN missing | Set POSTMARK_SERVER_TOKEN in your environment |
| TypeScript import error | Use import \{ ServerClient \} from "postmark" — not require() |
| Template payload error | Pass TemplateAlias as a string and TemplateModel as an object |
| Webhook returns 401 | Check your Basic Auth credentials in the webhook URL |
| Batch send failure | Use Promise.allSettled — Promise.all throws on the first rejection |
| MessageID missing | Await the send call and read result.MessageID from the response |
## Postmark Python SDK
### **New!** Quick Start
**Requirements**
- Python 3.10+
**Installation**
Install from PyPI as **postmark-python** (the Python package you import is still **postmark**):
pip install postmark-python
The SDK is fully async. All API calls must be awaited.
### Install from PyPI as postmark-python (the Python package you import is still postmark):
```bash
pip install postmark-python
```
### The SDK is fully async. All API calls must be awaited.
```python
import asyncio
import os
import postmark
# Tokens are read from the environment here. Optionally: pip install python-dotenv,
# then use load_dotenv() to populate os.environ from a .env file.
async def main():
async with postmark.ServerClient(os.environ["POSTMARK_SERVER_TOKEN"]) as client:
response = await client.outbound.send({
"sender": "sender@example.com",
"to": "recipient@example.com",
"subject": "Hello from Postmark",
"text_body": "Sent with the Postmark Python SDK.",
})
print(f"Sent: {response.message_id}")
asyncio.run(main())
```
### **New!** Two client types
| **Client** | **Token** | **Use for** |
|---|---|---|
| ServerClient | Server API token | Sending email, bounces, templates, stats, webhooks, streams |
| AccountClient | Account API token | Domains, sender signatures, managing servers, data removals |
### Example
```python
import postmark
# Use as async context managers to ensure connections are closed
async with postmark.ServerClient(os.environ["POSTMARK_SERVER_TOKEN"]) as client:
...
async with postmark.AccountClient(os.environ["POSTMARK_ACCOUNT_TOKEN"]) as account:
...
# Or call close() explicitly when done
client = postmark.ServerClient(os.environ["POSTMARK_SERVER_TOKEN"])
await client.close()
```
### **New!** Development
### Repository
```bash
git clone https://github.com/ActiveCampaign/postmark-python.git
cd postmark-python
poetry install
poetry run pre-commit install
```
### Testing
```bash
# Run tests
poetry run pytest
# Lint and type-check
poetry run pre-commit run --all-files
```
**Contributing**
1. Fork the repository
1. Create a feature branch
1. Add tests for your changes
1. Ensure all checks pass (poetry run pre-commit run --all-files)
1. Open a Pull Request
**Support**
- **Issues**: [GitHub Issues](https://github.com/ActiveCampaign/postmark-python/issues)
- **Postmark Support**: [support@postmarkapp.com](mailto:support@postmarkapp.com)
**License**
MIT — see [LICENSE](https://pypi.org/project/postmark-python/LICENSE).
## Postmark Rails gem
### Configuring your Rails application
You will need the [Postmark Rails gem](https://github.com/activecampaign/postmark-rails) for drop-in integration with ActionMailer.
Don’t forget to run the `bundle install` command every time you change something in your Gemfile.
The `postmark_settings` hash can contain [all options](https://github.com/activecampaign/postmark-gem#communicating-with-the-api) supported by `Postmark::ApiClient`.
### Add the postmark-rails gem to your Gemfile.
```bash
gem 'postmark-rails'
```
### Save your Postmark Server API token to config/secrets.yml.
```bash
postmark_api_token: "xxxxxxxx-xxxx-xxxx-xxxx-xxxxxxxxxxxx"
```
### Set Postmark as your preferred mail delivery method via config/application.rb:
```ruby
config.action_mailer.delivery_method = :postmark
config.action_mailer.postmark_settings = { :api_token => Rails.application.secrets.postmark_api_token }
```
### Send an email
Here’s a simple example of how to send a single HTML email with open tracking enabled. Take a look at the [README](https://github.com/activecampaign/postmark-rails/blob/master/README.md) for more examples.
### Example request
```ruby
class TestMailer < ActionMailer::Base
def hello
mail(
:subject => 'hello',
:to => 'receiver@example.com',
:from => 'sender@example.com',
:html_body => 'Hello from Postmark!',
:track_opens => 'true'
)
end
end
```
## Postmark Ruby gem
### Configuring your ruby application
You will need the [Postmark gem](https://github.com/activecampaign/postmark-gem) to get started.
If you’re using Bundler, don't forget to run the `bundle install` command every time you change something in your Gemfile.
### Install with Bundler
```bash
gem 'postmark'
```
### Create an instance of Postmark::ApiClient
```ruby
client = Postmark::ApiClient.new('server token')
```
### Send an email
Here’s a simple example of how to send a single HTML email with open tracking enabled. Take a look at the [README](https://github.com/activecampaign/postmark-gem/blob/master/README.md) for more examples.
### Example request
```ruby
client.deliver(
from: 'sender@example.com',
to: 'receiver@example.com',
subject: 'hello',
html_body: 'Hello from Postmark!',
track_opens: true
)
```
## Postmark .NET
### Installation
The [Postmark.NET NuGet package](https://www.nuget.org/packages/Postmark/) makes it easier to use the Postmark API from your .NET projects without having to build your own API calls.
If you need a strongly-named/signed .NET dll, you can use the [Postmark-Strong .NET Nuget package](https://www.nuget.org/packages/Postmark-Strong/) which includes the JSON.NET dependancy built-in to avoid versioning conflicts.
### Install with NuGet
```bash
PM> Install-Package Postmark
```
### Import
```ruby
using PostmarkDotNet;
```
### Send an email
Here’s a simple example of how to send a single HTML email with open tracking enabled. Take a look at the [wiki](https://github.com/activecampaign/postmark-dotnet/wiki) for more examples.
### Example request
```
var message = new PostmarkMessage()
{
To = "recipient@example.com",
From = "sender@example.com",
TrackOpens = true,
Subject = "A complex email",
TextBody = "Plain Text Body",
HtmlBody = " ",
Tag = "business-message",
Headers = new HeaderCollection{
{"X-CUSTOM-HEADER", "Header content"}
}
};
var imageContent = File.ReadAllBytes("test.jpg");
message.AddAttachment(imageContent, "test.jpg", "image/jpg", "cid:embed_name.jpg");
var client = new PostmarkClient("server token");
var sendResult = await client.SendMessageAsync(message);
```
## Postmark Java
### Installation
The [Postmark Java library](https://github.com/activecampaign/postmark-java) makes it easier to use the Postmark API from your Java 8+ projects without having to build your own API calls.
### Install with Maven
```
com.postmarkapp
postmark
{version}
```
### Send an email
Here’s a simple example of how to send a single email. Take a look at the [wiki](https://github.com/activecampaign/postmark-java/wiki) for more examples.
### Example request
```
Message message = new Message("from@example.com", "john@example.com", "Hello from Postmark!", "Hello body");
ApiClient client = Postmark.getApiClient("server token");
MessageResponse response = client.deliverMessage(message);
```
## Postmark PHP
### Installation
The [Postmark PHP](https://github.com/activecampaign/postmark-php) library is available as a Composer package on [Packagist.org](https://packagist.org/packages/wildbit/postmark-php).
### Install with composer
```bash
composer require wildbit/postmark-php
```
### Import
```php
require_once('./vendor/autoload.php');
use Postmark\PostmarkClient;
```
### Send an email
Here’s a simple example of how to send a single email. Take a look at the [wiki](https://github.com/activecampaign/postmark-php/wiki) for more examples.
### Example request
```php
$client = new PostmarkClient("server token");
$sendResult = $client->sendEmail(
"sender@example.com",
"receiver@example.com",
"Test",
"Hello from Postmark!");
```
## Postmark Craft plugin
### Installation
The [Postmark Craft plugin](https://github.com/craftcms/postmark) library is available as a Composer package on [Packagist.org](https://packagist.org/packages/craftcms/postmark).
You can also install the plugin via the [Craft Plugin Store](https://plugins.craftcms.com/postmark).
### Go to the project directory
```bash
cd /path/to/my-project.test
```
### Install with composer
```bash
composer require craftcms/postmark
```
### Tell Craft to install the plugin
```bash
./craft install/plugin postmark
```
Configuration
Once the Postmark Craft plugin is installed, go to **Settings** → **Email** in the Craft admin area, and change the **Transport Type** setting to **Postmark**.
Then enter your **Postmark Server Token**. This can be found on the **Server** → **API Tokens** page within [your Postmark account](https://account.postmarkapp.com/servers).
If you wish to send email using a custom [Message Stream](https://postmarkapp.com/support/article/how-to-create-and-send-through-message-streams), set the **Message Stream ID**. (The default transactional Message Stream will be used if this is left blank.)
When you’re done, hit **Save.**
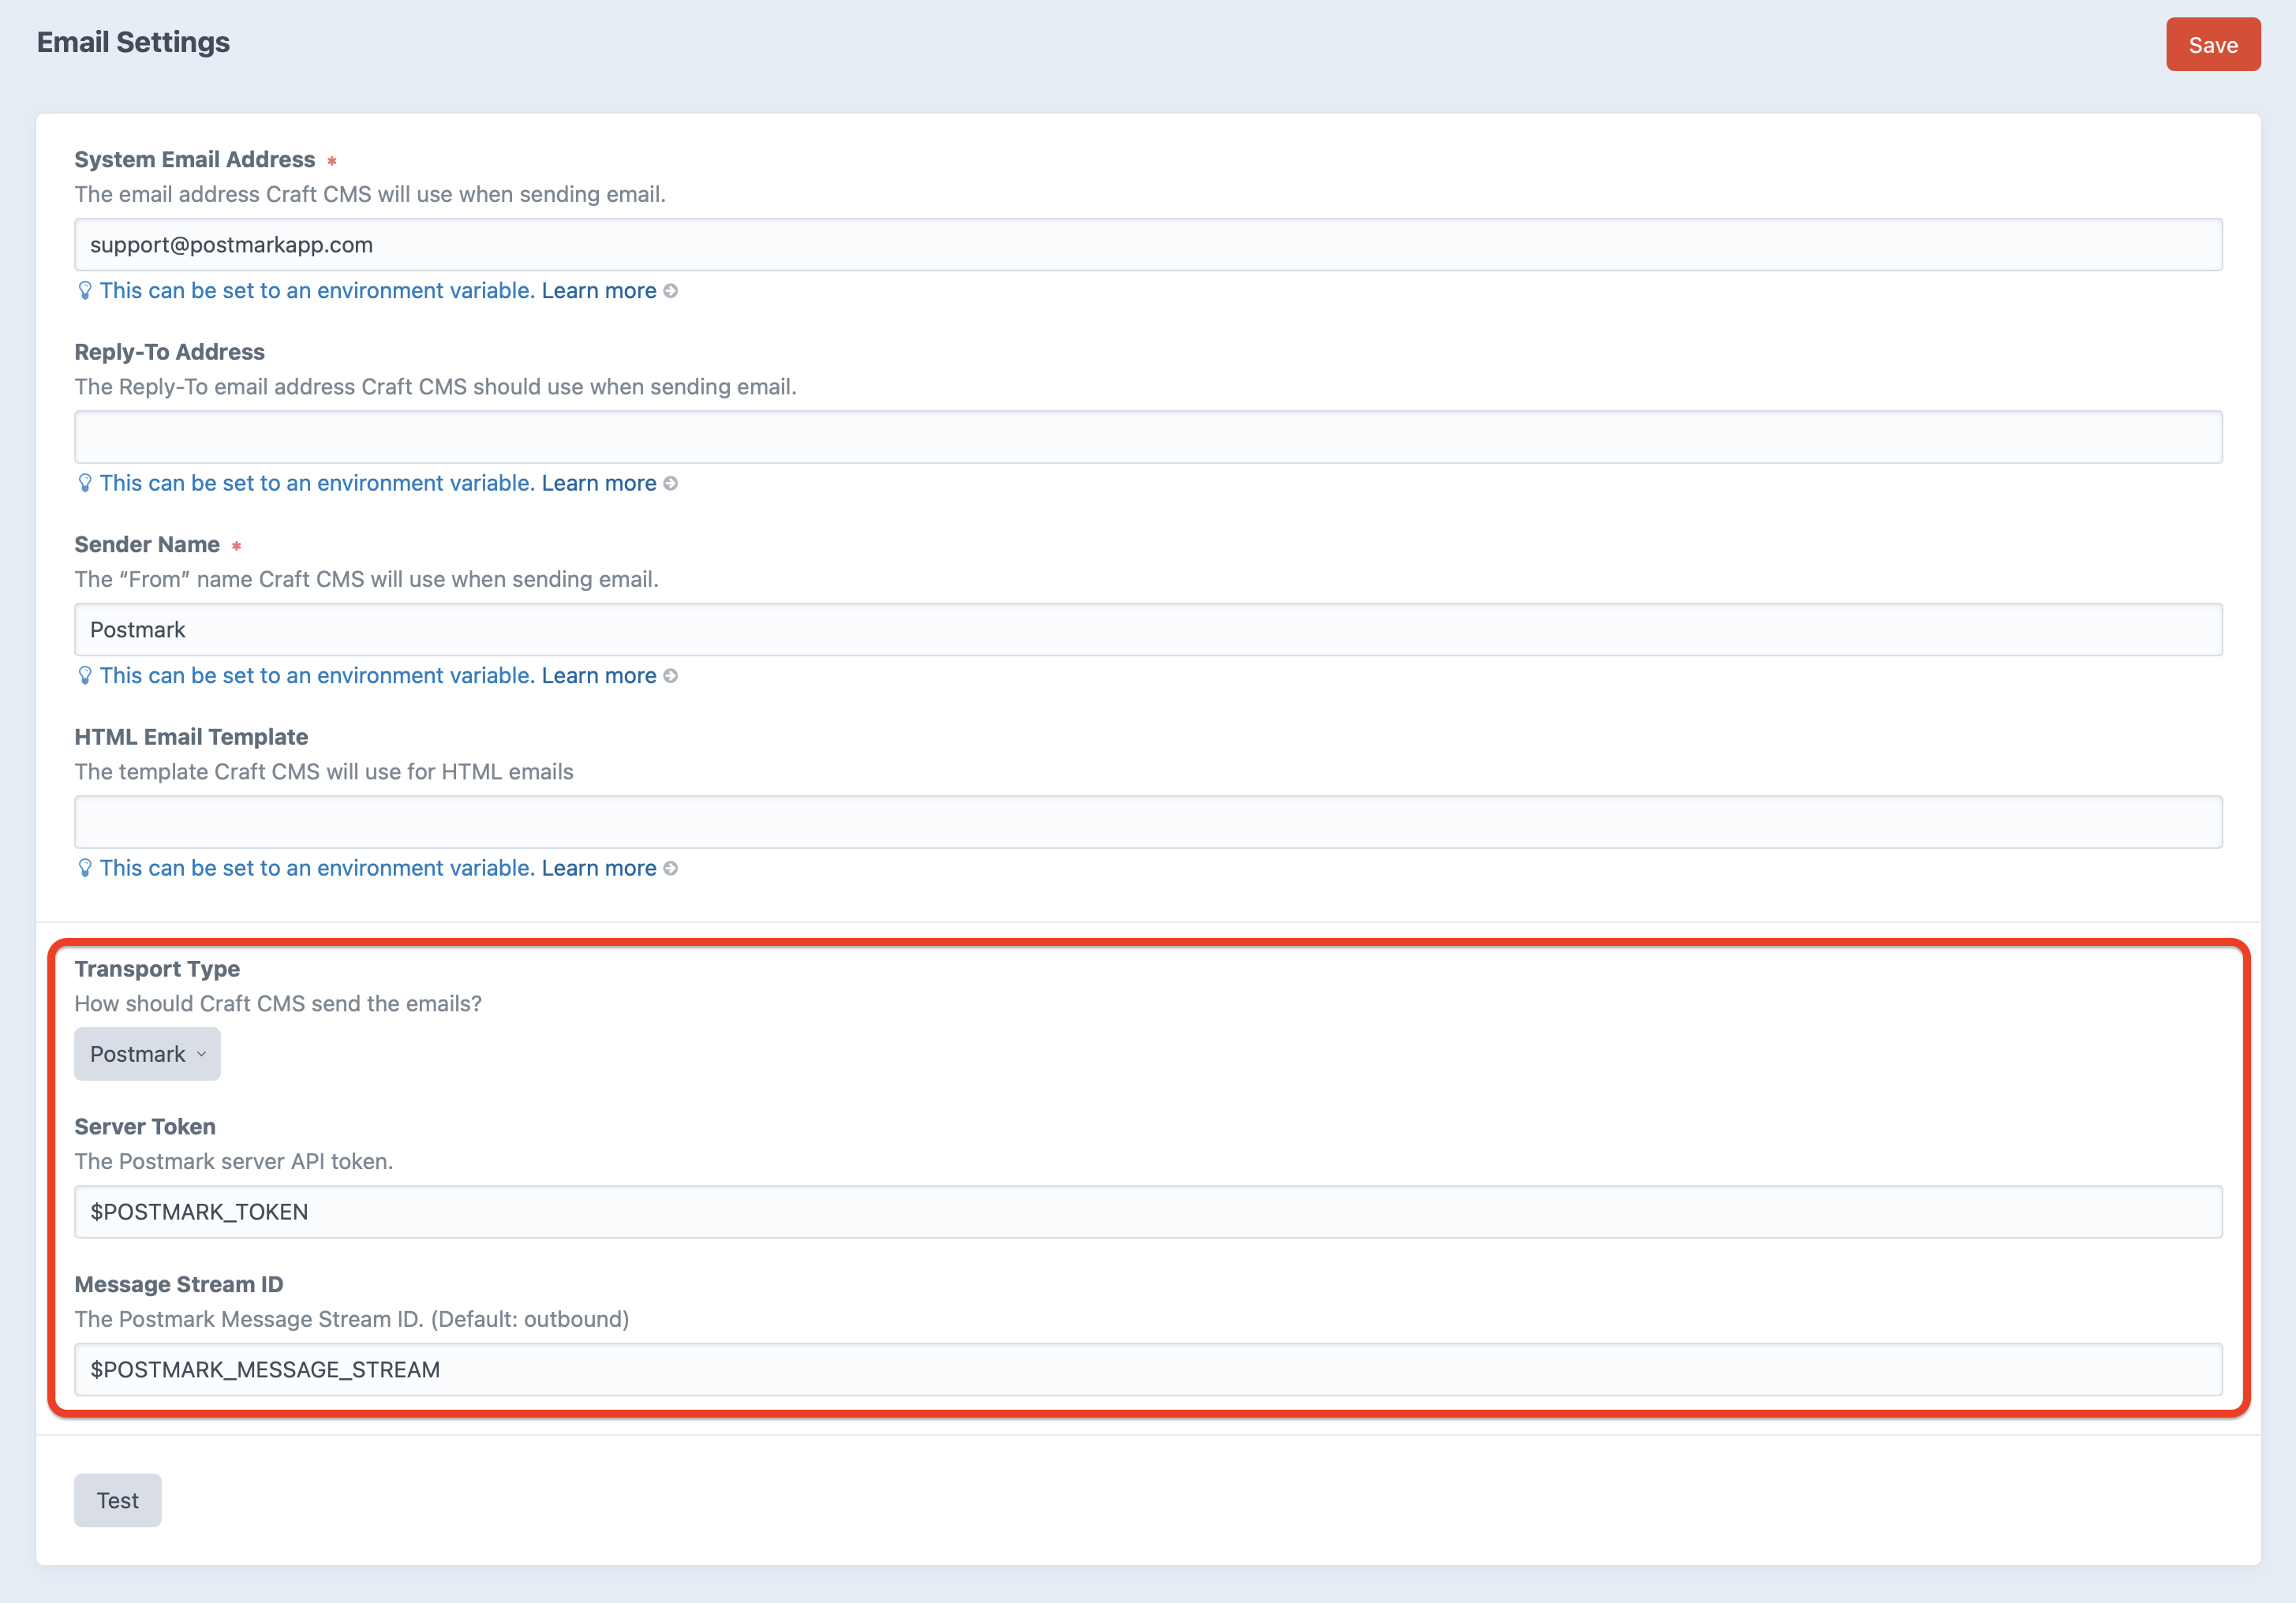
_**Tip!** Your Postmark Server Token and Message Stream ID can also be set using environment variables. See _[_Environmental Configuration_](https://docs.craftcms.com/v3/config/environments.html)_ in the Craft docs to learn more about that._
## Postmark Node.js
### Installation
The [Postmark Node.js](https://www.npmjs.com/package/postmark) library is available as an [npm](https://www.npmjs.com/) package.
### Install with npm
```bash
npm install postmark --save
```
### CommonJS (require)
```js
var postmark = require("postmark");
```
### TypeScript / ESM (import)
```
import { ServerClient } from "postmark";
```
### Send an email
Here's a simple example of how to send a single email. Take a look at the [documentation](https://activecampaign.github.io/postmark.js/) for more examples.
### CommonJS
```javascript
var serverToken = "xxxx-xxxxx-xxxx-xxxxx-xxxxxx";
var client = new postmark.ServerClient(serverToken);
client.sendEmail({
"From": "sender@example.com",
"To": "receiver@example.com",
"Subject": "Test",
"TextBody": "Hello from Postmark!"
});
```
### TypeScript
```
import { ServerClient } from "postmark";
const client = new ServerClient(process.env.POSTMARK_SERVER_TOKEN!);
const result = await client.sendEmail({
From: "sender@example.com",
To: "receiver@example.com",
Subject: "Test",
TextBody: "Hello from Postmark!",
MessageStream: "outbound",
});
console.log({ messageId: result.MessageID });
```
### **New!** Send an email
For production transactional email — receipts, welcome emails, password resets — use sendEmailWithTemplate with a TemplateAlias and typed TemplateModel. This keeps your email layouts separate from application code and returns a MessageID you can use to correlate delivery and bounce webhooks. See the [TypeScript integration guide →](https://postmarkapp.com/developer/integration/official-libraries#typescript) for batch sending, webhook verification, and a repair guide.
### Template send
```typescript
import { ServerClient } from "postmark";
const client = new ServerClient(process.env.POSTMARK_SERVER_TOKEN!);
const result = await client.sendEmailWithTemplate({
From: "billing@acme.example",
To: "customer@example.com",
TemplateAlias: "receipt",
TemplateModel: {
receipt_id: "rcpt_123",
amount: "$49.00",
dashboard_url: "https://acme.example/dashboard",
},
MessageStream: "outbound",
});
console.log({ messageId: result.MessageID });
```
### Nodemailer
You can optionally use [nodemailer](https://github.com/ActiveCampaign/postmark-nodemailer) to send transactional emails through Postmark.
## Postmark CLI
**Installation**
Before you get started, install [Node.js](https://nodejs.org/en/) and make sure that your Postmark [server and account tokens](https://postmarkapp.com/support/article/1008-what-are-the-account-and-server-api-tokens) are handy.
From the command line, run:
```
npm i postmark-cli -g
```
Once npm does its thing, run the `postmark` command and you will see some high-level usage details. You’re all set!
**Pro tip:** You’ll be asked to authenticate by entering your server or account token each time you run a command. If you prefer, you can bypass this step by supplying tokens as [environment variables](https://github.com/activecampaign/postmark-cli/wiki/Authentication).
**Usage**
After installation, type `postmark` in your command line to see a list of available commands. Check out the [wiki](https://github.com/activecampaign/postmark-cli/wiki) for instructions on how to [send emails](https://github.com/activecampaign/postmark-cli/wiki/email-command), [manage templates](https://github.com/activecampaign/postmark-cli/wiki/templates-command), or [list servers](https://github.com/activecampaign/postmark-cli/wiki/servers-command).
```
$ postmark
Commands:
postmark email [options] Send an email
postmark servers [options] Manage your servers
postmark templates [options] Pull and push your templates
Options:
--version Show version number
--help Show help
```
**Further documentation**
- [GitHub repository](https://github.com/activecampaign/postmark-cli)
- [Detailed instructions](https://postmarkapp.com/blog/feature-announcement-introducing-the-postmark-cli)
- [Managing your Postmark templates with Github using Travis CI or CircleCI](https://postmarkapp.com/blog/managing-your-postmark-templates-with-github-using-travis-ci-or-circleci)
## Postmark for WordPress
[Postmark for WordPress](https://wordpress.org/plugins/postmark-approved-wordpress-plugin/) (fork on [Github](https://github.com/activecampaign/postmark-wordpress))
### Installation
1. Download the [Postmark for WordPress Plugin](https://downloads.wordpress.org/plugin/postmark-approved-wordpress-plugin.zip)
1. Upload postmark directory to your `/wp-content/plugins` directory
1. Activate the plugin in your WordPress admin
1. In the WordPress admin, go to Settings > Postmark. You will then want to insert your Postmark details.
1. Verify sending by entering a recipient email address you have access to and pressing the “Send Test Email” button.
1. Once verified, then check “Enable” to override wp_mail and send using Postmark instead.
See the [FAQ](https://postmarkapp.com/support/article/1138-postmark-for-wordpress-faq) for answers to common questions.
## Postmark Grunt
### Installation
The [Postmark Grunt](https://www.npmjs.com/package/grunt-postmark) plugin is available as an [npm](https://www.npmjs.com/) package.
### Install with npm
```bash
npm install grunt-postmark --save
```
### Load task in Gruntfile
```js
grunt.loadNpmTasks("grunt-postmark");
```
### Send an email
Here’s a simple example of how to send an email. Take a look at the [documentation](https://www.npmjs.com/package/grunt-postmark#postmark-task) for more examples.
### Example task
```js
grunt.initConfig({
postmark: {
options: {
serverToken: "server token",
from: "sender@example.com",
to: "receiver@example.com",
}
email: {
subject: "Test",
src: ["email-content.html"]
}
}
});
```
## Postmark Zapier Actions
### Installation
The Postmark Zapier Actions are available on [Zapier](https://zapier.com/apps/postmark/integrations).
### Configuration
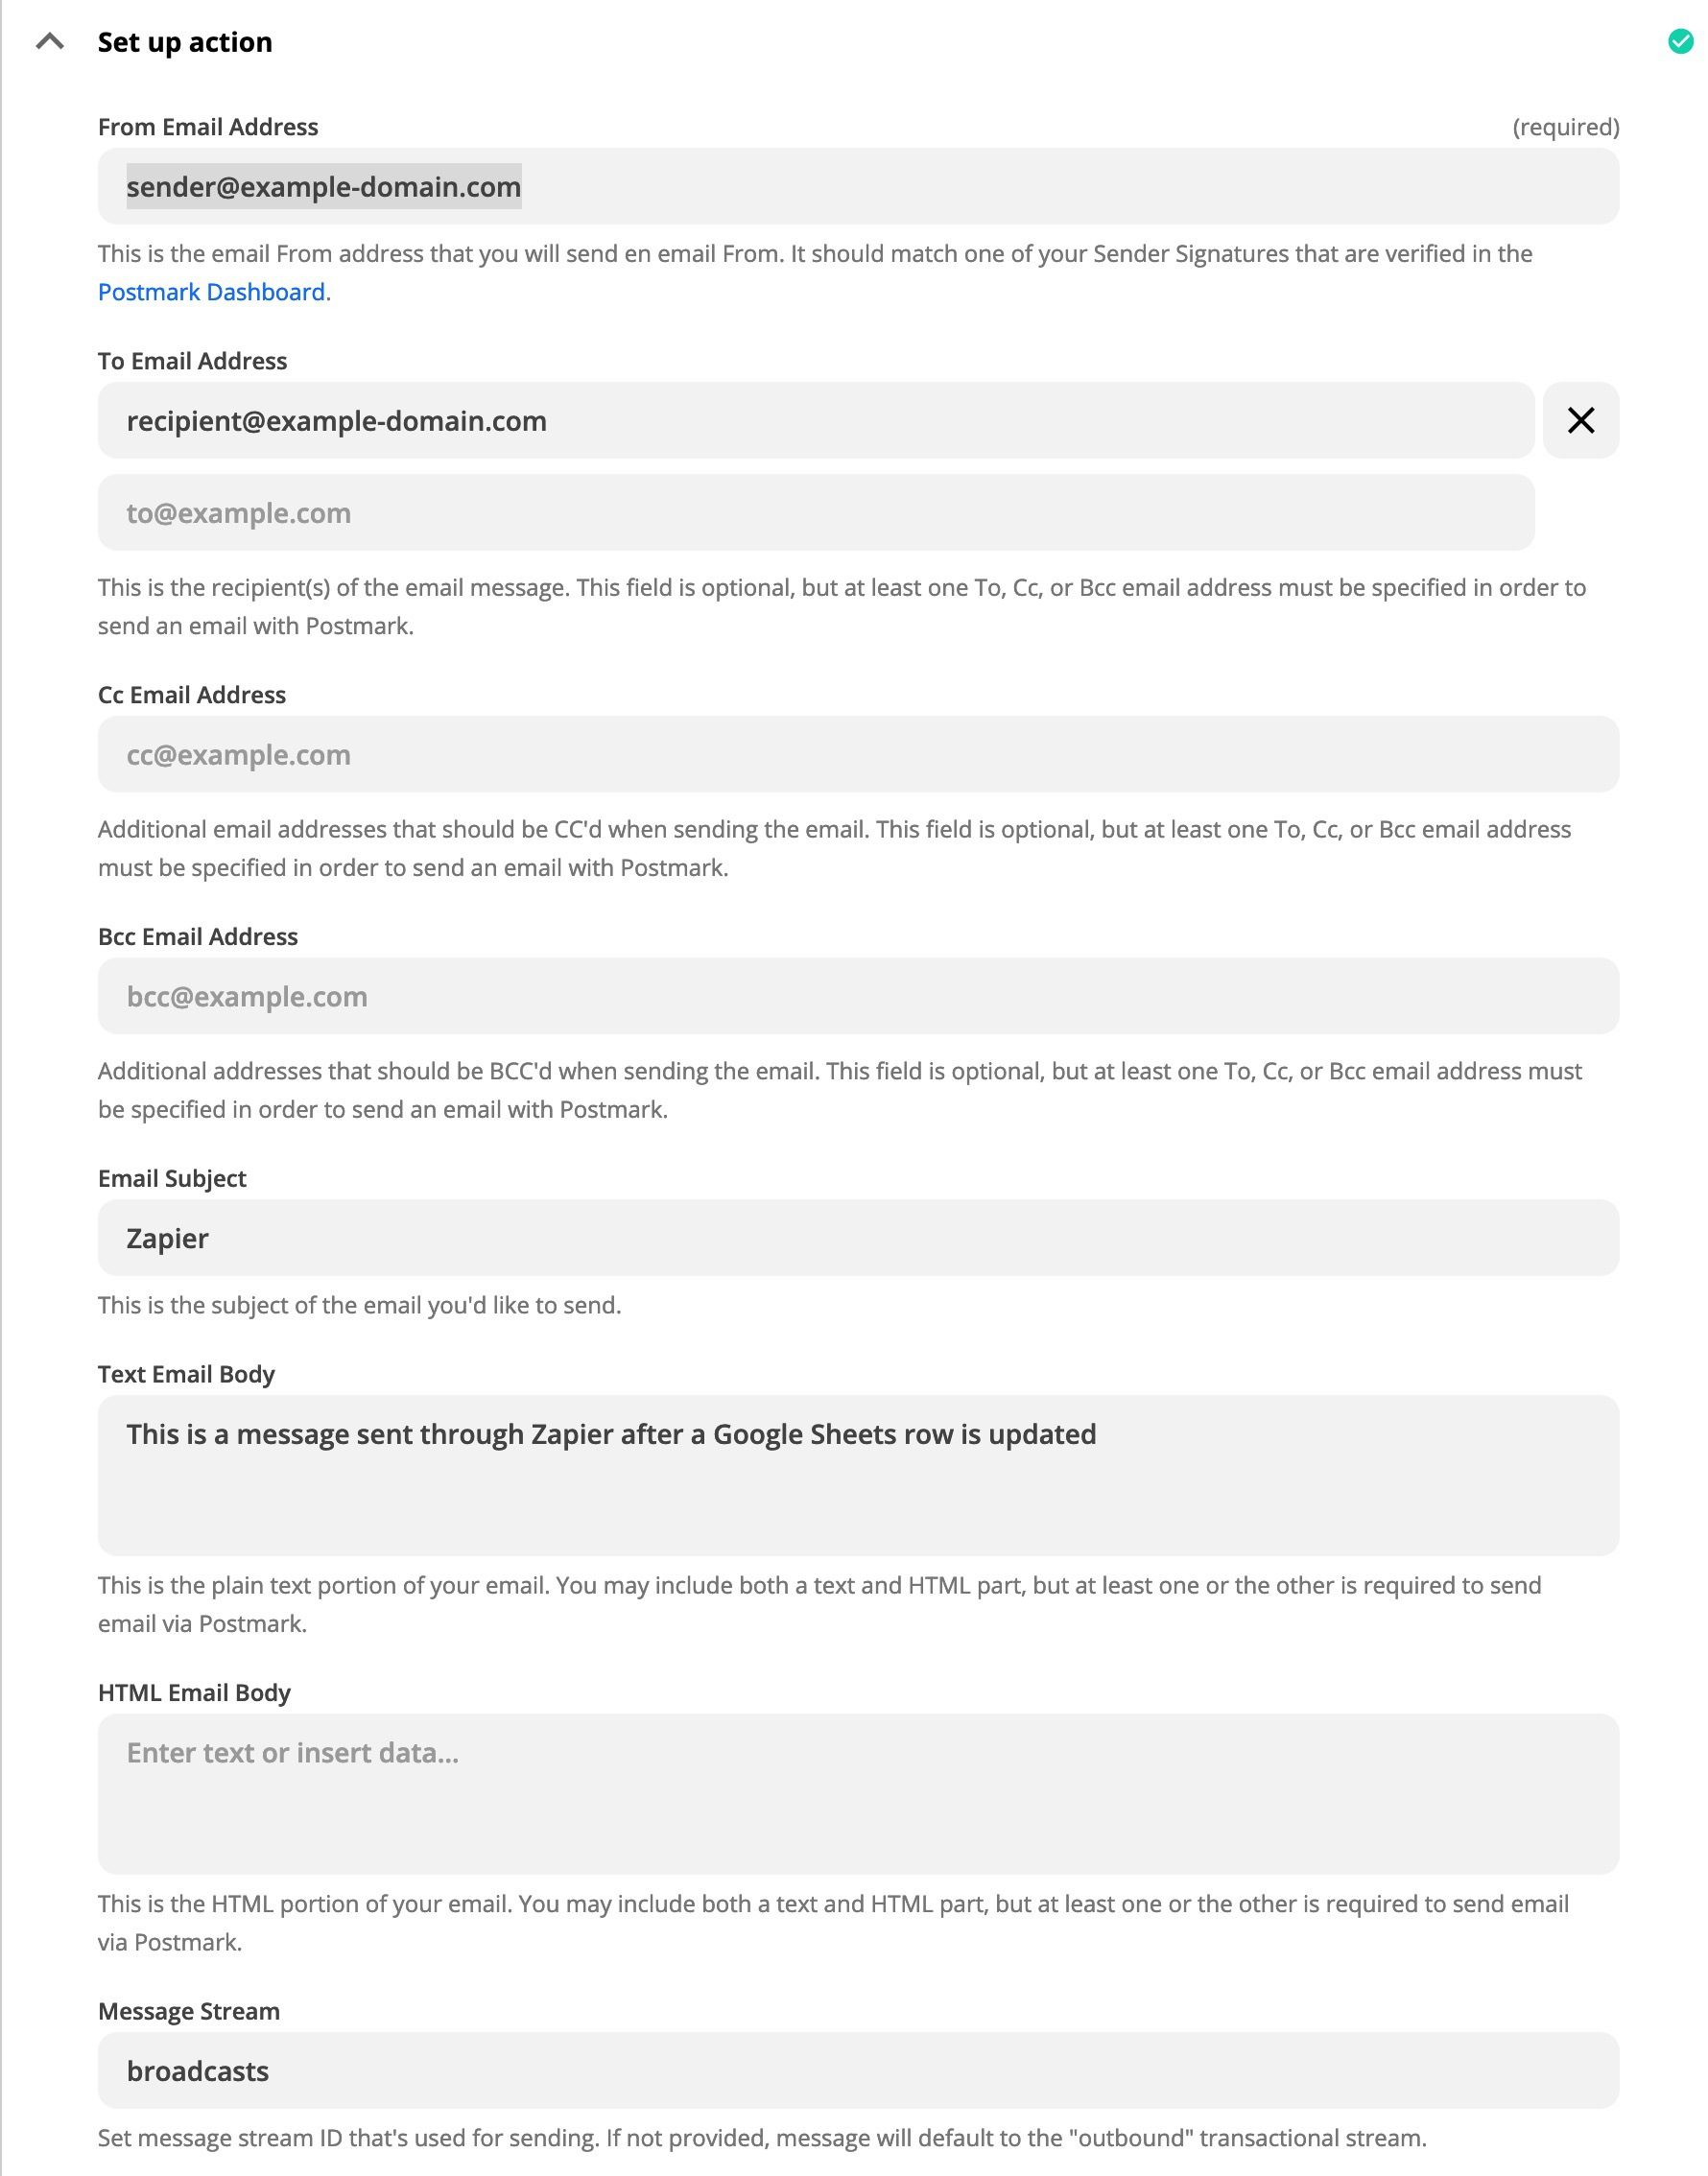
Our Zapier Actions support both Send an Email and Send an Email With Template. When integrating with a Zapier Trigger, set the data into the respective fields when Zapier prompts, like To, From, Subject, etc.
If you wish to send email using a custom [Message Stream](https://postmarkapp.com/support/article/1207-how-to-create-and-send-through-message-streams), set the **Message Stream ID**. (The default transactional Message Stream will be used if this is left blank.)